Showing posts with label diy. Show all posts

4/25/2013

DIY: Aztec Shorts


Since I love prints and colors, aztec prints are perfect for me! Here is an idea to update an old pair of denim short! 

1. Choose a fabric of your choice, preferably with a thick texture for better support


2. Measure out the fabric onto the parts where you want to place the print. I placed mine on the right leg, top left pocket and right back pocket. Make sure to leave an extra inch to sew the hem.


3. Pin the printed fabric to the shorts using dress pins.
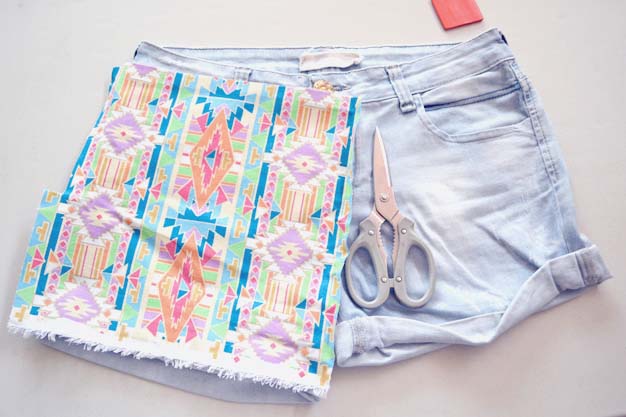

4. Sew using a machine or hand stitch. I had to hand stitch some of the areas, particularly the pocket area and the zipper line. Then, you should get something like this!


5. Pair with a simple tee :)


I apologize for the extremely late post! I have been wanting to share DIY videos but something is wrong with my Windows Moviemaker and I can't seem to find a good video maker similar to it :/

Plus, I am thinking of giving my blog a makeover! Since this template has some errors to it.

It is summer now where I live, at 35 degrees Celsius! Crazy summer heat is making me very lazy!  


11/05/2012

DIY: Skull Cut-Out


I saw this exact top at H&M HK on sale, but even if it was on sale, I still did not buy it. Why buy if you can make one for free?? For this DIY, I used my brother's old shirt which had a rock n roll skull print in the front. All other materials needed are scissors, marker/chalk and a skull print-out. I had to shoot this indoors since its been raining for days here in Manila.


1. Grab an old shirt, if its a big shirt, then follow the steps below. If you already have a tank ready, skip the 3 steps below. Get your scissors, skulls print-out and fabric marker/chalk ready.


2. Lay down the shirt flat on a surface and make sure that the sides are on the seams. Cut off the sleeves of the shirt. I would suggest to cut a few inches below the sleeve so you don't end up with a large sleeve hole. It is best to try on the shirt after cutting the sleeves off so you can adjust it accordingly to your liking.  


3. Fold your shirt halfway vertically. Cut off the neckline, again, just keep it a few inches below the seam. You can always cut more when you need to but once you cut too much off, its harder to fix it. 


4. Cut off the bottom of the shirt to shorten the length.


5. Place the back of the shirt flat on a surface. Get your marker and begin to draw the cut-outs of the skull using the sample as a guide. Don't worry if you cannot draw, what's great about this DIY is that it does not have to look perfect. I am very poor at drawing myself so I'm sure you can do it.      
                         

6. Once you have your drawings, you are ready to CUT!


7. I started with the eye area and made adjustments with the cut-outs as I go along.   


8. Once you have all the cut-outs, it will turn out something like this.


You have the option of wearing it alone with a bra only but I am quite conservative so I would wear mine with a lace camisole under, still keeping a hint of skin! :P


10/09/2012

DIY FEATURE: Spike Leggings

I just wanted to share a DIY made by cousin, spike leggings. I would describe her style as rocker-chic since she is always wearing black, spikes and boots. This is a simple and quick way to revamp your old black leggings. All you need are spikes, black leggings, needle and thread.    


My cousin used a silver spike bracelet (plastic), cut it apart and sewn it onto the sides of the leggings. Spikes made out of plastic are advised since leggings are light-weight materials.
Here is an up-close photo.


I have actually seen these leggings being sold at stores and it would be a way cheaper alternative to create your own! I have also seen leggings with spikes on the knees, which seems dangerous to me. Imagine tripping and falling to your knees while wearing it :O but if its made of plastic,  I am guessing it would not hurt :P


9/10/2012

DIY: Lace Shorts


 I was about to toss this pair of old faded black shorts when I came across Youtube videos of lace shorts and decided to recreate it. I have been meaning to buy a pair of lace shorts in either cream or off-white color but this black pair will do for now :)  If you will be making this, I would suggest to choose a lace with a wider width of around 2 inches. That way you would not need to create a lot of layers like mine! My lace had a width of about 1 inch and I ran out of lace halfway through the process!  I chose this lace because of the scallop detail which gives it an overall texture. Check out the steps below.

Materials Needed:
1. Old pair of shorts (Mine is super faded!)
2.Yards of lace trim (this will depend on the width of the lace)
3. Pins
4. Scissors
5. Needles or Sewing Machine
6. Thread


1. Layout and measure the lace onto your shorts. I started from the bottom to top. Leave half an inch on each end and fold it inside. This will prevent the trim from fraying. Use pins to secure the placement of the lace trim.  


2. Continue layering the lace trim with the design that you want. I wanted it to be full lace all the way to the top so I cut off the belt hooks and sewn the pockets in.


3. For the back, I added trim to the pockets and waist. Again, I removed the belt hooks and buttons. I used only 2 layers for each part. I wanted to include the bottom but I ran out of lace. The pockets were hand-stitched since I wanted to keep the pockets open.  


4. Sew the lace trim with a sewing machine or with a needle and thread. Sewing the middle part of the shorts was difficult and I had to hand-stitch the part towards the zipper. Keep on sewing and sewing..until you have sewn all layers! Be patient and do it part by part. 


5. This is how the back looks:


6. And this is how the front turned out :) I am happy with the result despite that it took me almost a week to complete. I did one part per day and it just gets more exciting towards the end when you see the final product :)


I will most probably make another one in cream, using a WIDER width of lace! I used about 11 yards of lace for entire shorts heee :)

8/14/2012

DIY: Fringe Clutch


Its been so long since my last post! I have been very busy the entire July plus I also encountered camera troubles during the diy so pardon the poor photos!

I came across this diy fringe clutch from teenvogue.com and decided it would be the perfect diy for the fringe trend. I am not not a clutch person since I can be clumsy and forgetful at times but I am open to trying out new things (one of my goals for 2012). Teenvogue used multi-colored fringes on a black clutch but I decided to stick to a monochrome tone in orange. Check out steps below!   

MATERIALS:
1. Plain clutch
2. 3 meters of fringe (depends on the size of your clutch)
3. Glue gun
4. Super glue
5. Ruler
6. Scissors  
7. Marker


1. Lay out the fringe on the clutch and measure out the spacing you want for each line. Mine measured  about 1.7 inches. Place markings on each spacing.


2. Use a ruler to draw horizontal lines. (The small lines on the right were mistakes in measurement :P)


3. If you have never used fringes before like me, you will find out that once you cut the fringe, it will immediately fray. Make sure to secure the edges of the fringe by gluing a piece over to the back with super glue. This will prevent the fringe from fraying.


4. Start from the bottom. Place hot glue on the fringe and paste onto the horizontal lines. Make sure to do this by parts or else the glue will not stick.


5. Continue until you have completed each line :)


Throw on a colorful bohemian outfit with your diy fringe clutch :)


You can use this trend on shirts, dresses, bags or shoes! Just be creative and enjoy making it :)


7/09/2012

DIY: iPhone Case


I recently bought ethnic-printed fabrics and I wanted to use it for my next DIY, iPhone case. I have been wanting to change my case for a while now so I decided that this was the perfect opportunity to combine the two. I was not even sure if this would work but it did! and I am happy as to how it turned out. If you want to know how I made this, scroll down below for the steps.  


1. The first step is to cut out the area of the fabric that you want to use. Make sure that there is at least 1 inch extra fabric around the case. Next, lay out the casing over the fabric and trace the camera hole and side buttons with pencil. Cut out the holes using scissors.


2. Prepare your glue mixture. Mix 3:1 glue to water ratio.

3. Brush the glue mixture over the casing 


4. Place the fabric over the casing and brush over with glue.
5. Tape down the edges of the fabric onto the inside of the casing. Brush glue over the sides twice.
6. Let the case dry overnight.


7. Use scissors to trim off the excess fabric.


8. Brush a layer of clear nail polish for "varnish". I did not have any varnish or clear spray on hand so I used clear nail polish instead which works just as well ! *Make it work*


9. Let it completely dry for a few hours.  


The case smelled like glue + polish for the first 2 days but disappeared right after. I would advise those who will be making this to use fabrics with a more sturdy texture. I don't think fabrics such as silk or satin will hold on to the case.  Thats it! :)

You could also just glue pearls or fancy stickers onto the casing :)

"Will you be making your own iPhone case? :) "